beepy-ppa
Beepy Quick Start
- Hardware setup
- Create a bootable SD card
- Flashing firmware
- Pre-boot setup
- First-boot setup
- Applications and services
Hardware setup
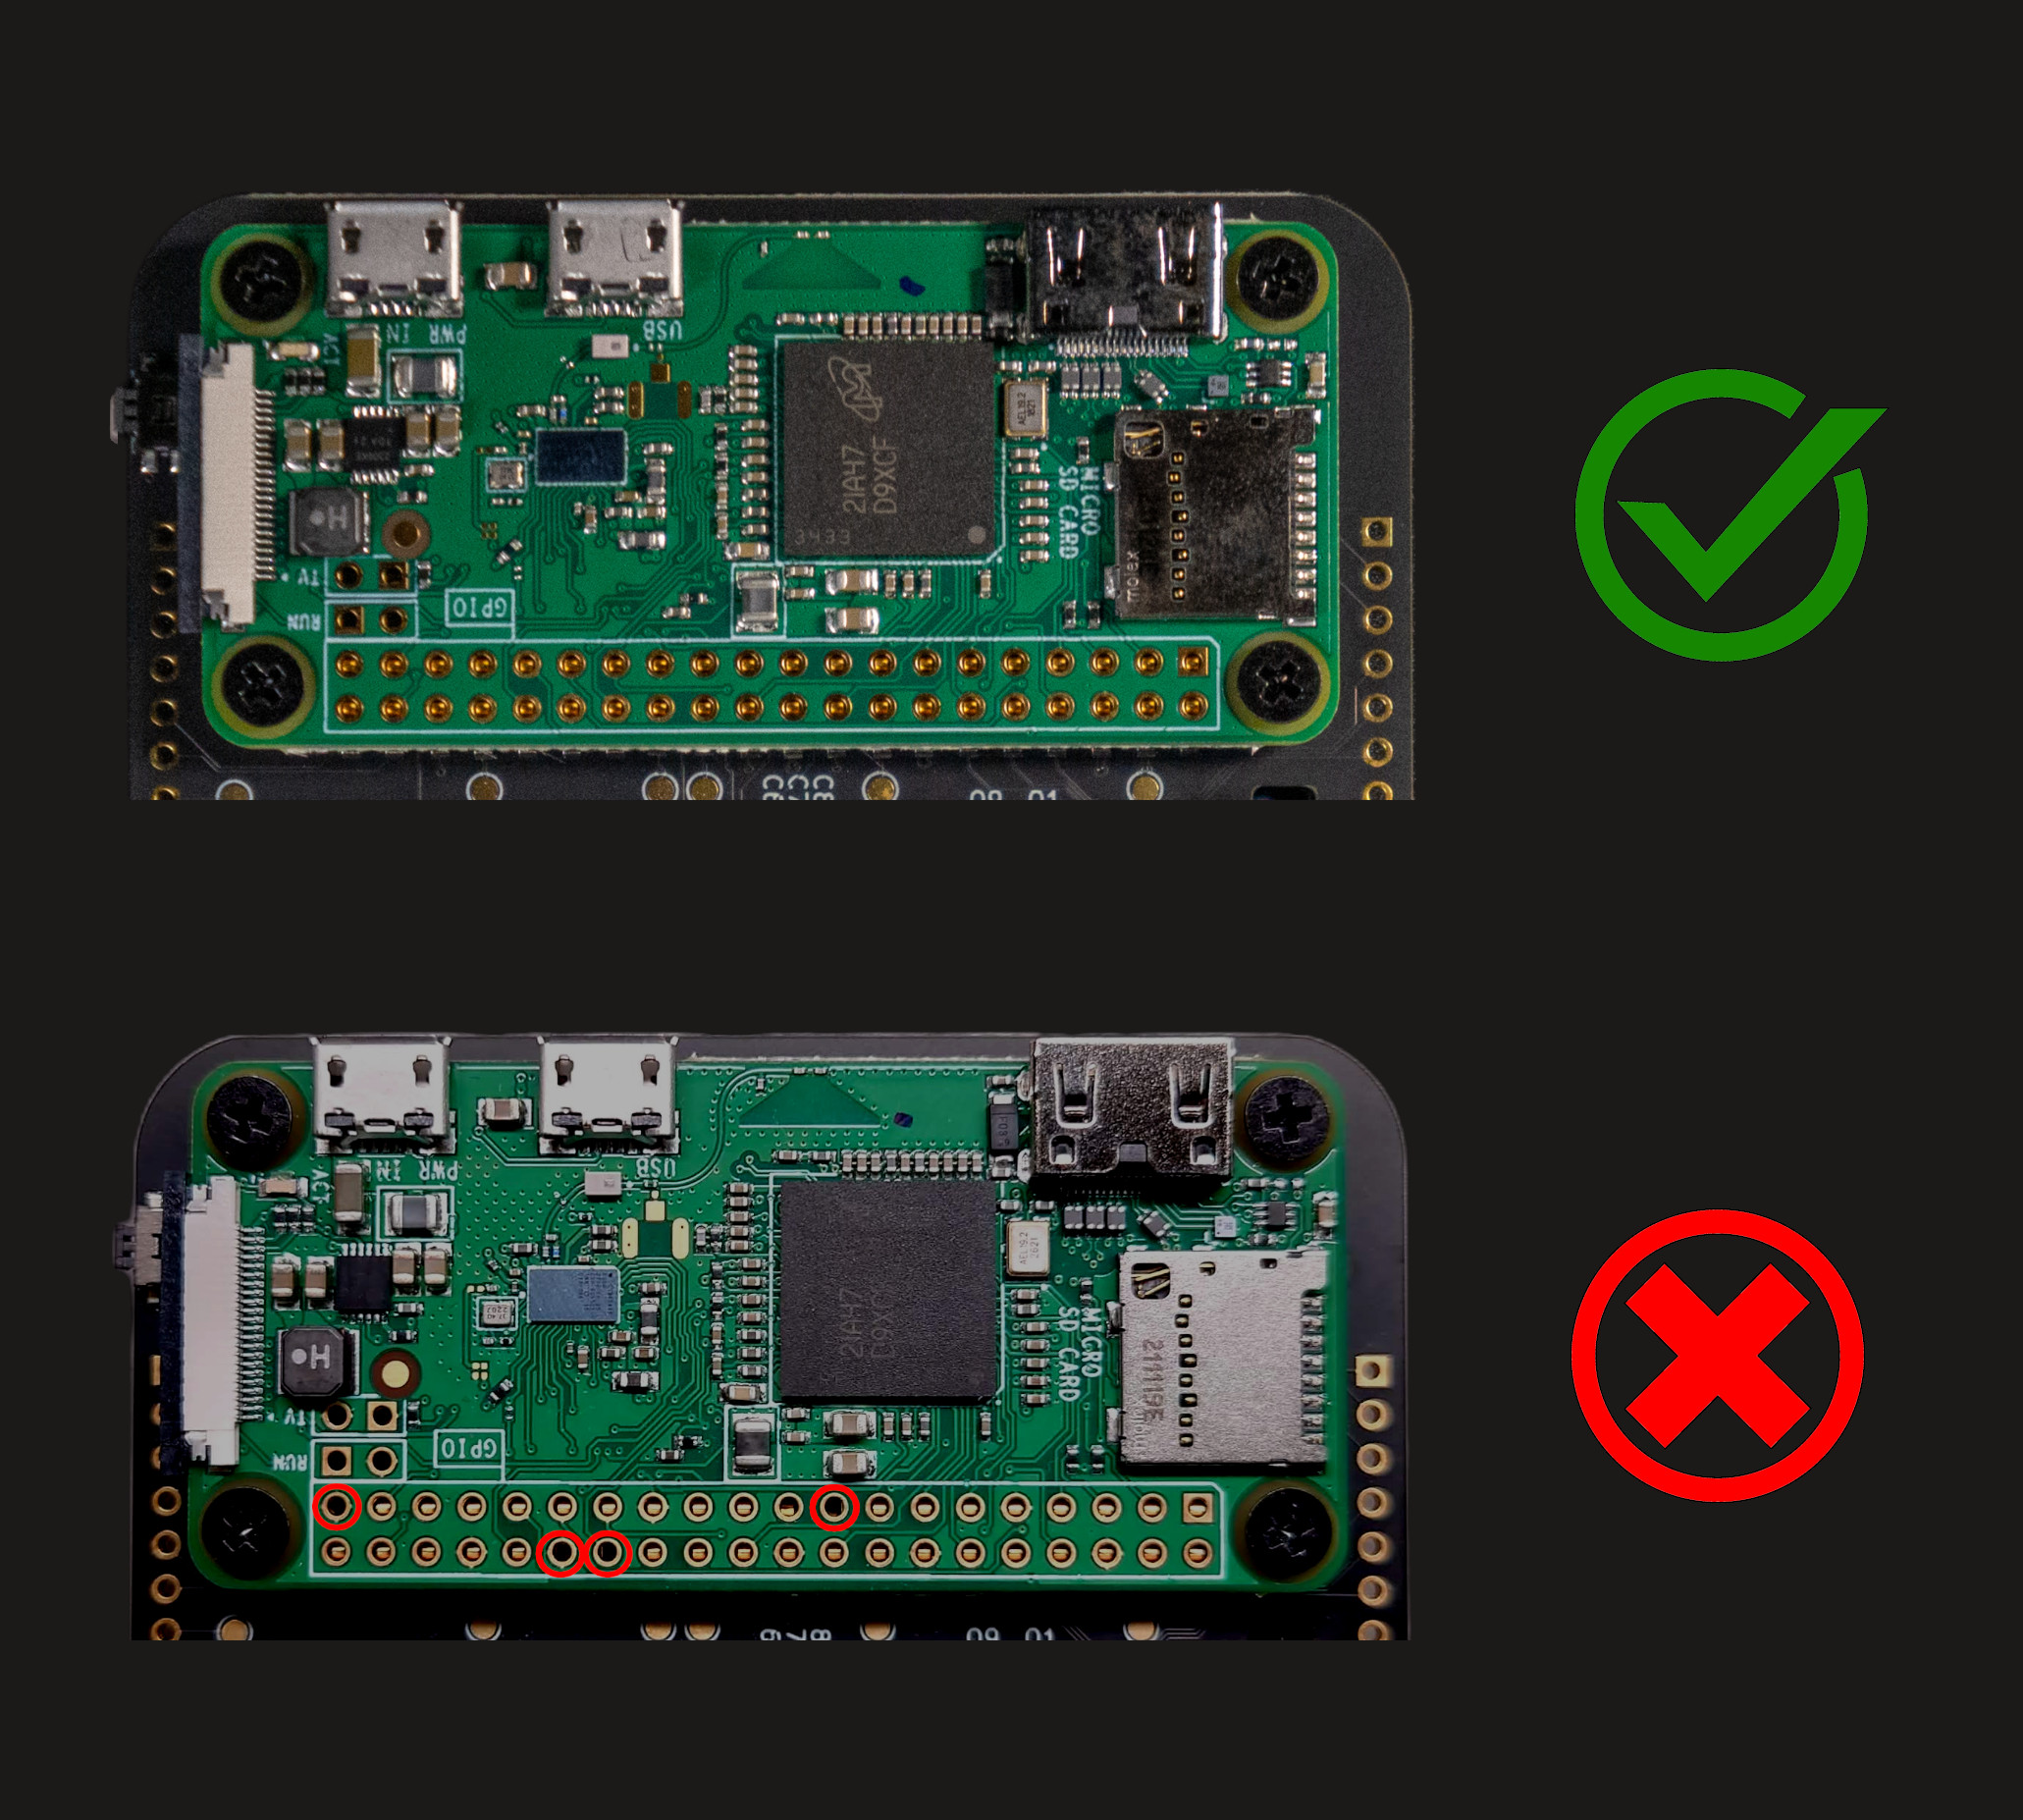
If you are installing your own Raspberry Pi Zero or any other SBC, make sure all the mounting pins are properly aligned to each hole before tightening the screws. If you cannot see the pin through a header hole, then it is not properly mounted. Move the board around until all the pins “click” into place. Skip this step if the Pi is already pre-installed.

The USB-C port at the bottom powers and charges the Beepy. Do not power the Raspberry Pi Zero through its Micro-USB port (PWR IN).
Create a bootable SD card
Beepy Raspbian is a customized version of Raspbian, the official Debian distribution for the Raspberry Pi. Beepy Raspbian is an all-in-one image for Beepy, with device drivers, optimizations, and OS services preinstalled and configured for you.
Once you install Beepy Raspbian, you can manage your Beepy just like a normal Debian Linux device.
Download the latest release of the Beepy Raspbian distribution here: https://github.com/ardangelo/beepy-gen/releases/. Unzip the image to obtain an image file sdcard.img. Use your disk imager of choice to flash the entire image to a microSD card.
- Mac OS / Linux:
sudo dd if=2024-04-23-Beepy.img of=/dev/sdX - Windows: Rufus disk imaging tool
Flashing firmware
If you’re setting up a new Beepy device, it’s recommended to flash the firmware directly from the latest firmware release. After your Beepy is set up, you can apply future firmware updates on-device using a simple utility.
-
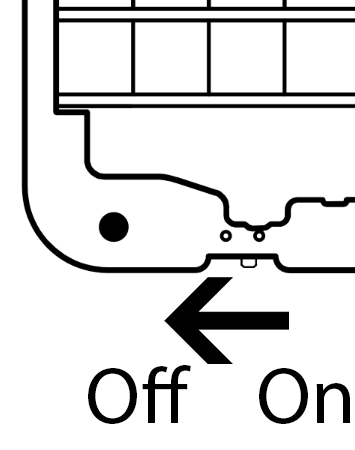
Turn the power switch off. With the device facing up, slide the power switch in the bottom-left hand corner to the left.

-
Connect the Beepy to your computer via USB-C.
-
Locate the “End Call” key. It is the rightmost key on the top row of four function keys.
-
While holding the “End Call” key, slide the power switch back on to enter firmware flash mode. In firmware flash mode, the LED will light up, and the Beepy will present itself as a USB mass storage device on your computer.
-
Copy the firmware image onto the presented drive just like a normal file. When copying is complete, Beepy will automatically flash and reboot with the new firmware.
More firmware configuration and update information: Beepy Firmware.
Pre-boot setup
The display driver automatically adds terminal configuration lines to the Raspberry Pi cmdline.txt file at /boot/firmware/cmdline.txt. It configures the Linux framebuffer, including font size. You can edit this file from your computer by inserting the microSD card and editing the file on the boot partition at /boot/firmware/cmdline.txt.
The cmdline.txt option fbcon=font:VGA8x8 configures a default font size of 30 rows and 50 columns. This can be changed to font:VGA8x16 for a larger font, but you may have rendering problems with such small terminal dimensions. More fonts and options for the fbcon module can be found at https://www.kernel.org/doc/Documentation/fb/fbcon.txt.
First-boot setup
Insert the microSD card into the Raspberry Pi, and insert a USB-C cable into the Beepy’s charge port to keep it charged during setup. Turn the power switch on. With the device facing up, slide the power switch in the bottom-left hand corner to the right.
The screen will turn on, but display static. The notification LED in the top-left hand corner will turn solid green. This will continue for about 20 seconds, depending on the speed of your microSD card. During this first boot, Raspbian is resizing the main partition to fill the free space on the card.
Once the display driver is configured, you will see scrolling white-on-black text on the screen, and the notification LED will turn off. Beepy will reboot again, this time to a series of dialogs.
Initial user account configuration
The first dialog configures the default account’s username and password.
Due to the limited number of keys, there are different shortcuts and modes mapped by the keyboard driver. For a full explanation on key mapping, see the Beepy keyboard user guide.
Basic key mapping summary,
The alternate symbols printed directly on the keys are sent by pressing the
Physical Altkey on the bottom left corner of the keyboard, then pressing the key on which the desired symbol is printed. WhilePhysical Altis active, you will see anaindicator in the top right corner of the screen:. The combination
Physical Alt+Enteris also mapped toTab.Physical Altis a “sticky modifier key”.
For additional symbols not printed directly on the keys, use the
Symbolkey on the bottom row of the keyboard. WhileSymbolis active, you will see anSindicator in the top right of the screen:. Internally,
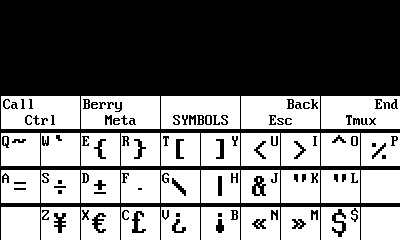
Symbolsends AltGr (Right Alt), which is mapped to more symbols via the keymap file at/usr/share/kbd/keymaps/beepy-kbd.map.Symbolis a “sticky modifier key”. You can view the Symbol key map by holding theSymbolkey for 1 second. Modifying the keymap file will also update the Symbol key map displayed; below is the default key map:
From left to right, the top row of the Beepy keyboard has the following keys:
- “Call”, a phone facing up.
- Single click: Enter Control key (sticky modifier).
- Short hold: Lock Control key (sticky modifier).
- “Berry”: a collection of sections shaped like a fruit.
- Single click: Enter Meta mode.
- Short hold (1s): Display Meta mode reference overlay.
- “Touchpad”: pressing the touchpad sensor will click and produce a key event.
- Single click: by default, enable touchpad mode, sending arrow keys. If touchpad mode is already on, a single click will send
Enter.- “Back”: an arrow looping back onto itself.
- Single click: send
Escape. Commonly used to exit menus in utilities.- “End Call”: a phone facing down, with a line underneath.
- Single click: Send the tmux prefix. Prefix is configurable in the driver keymap.
- Short hold (1s): Open the tmux menu. If the Pi has been shut down, a short hold will turn the Pi back on.
- Long hold (5s): send a shutdown signal to the Pi.
Meta mode summary,
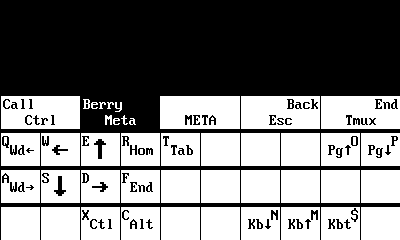
Meta mode is a modal layer that assists in rapidly moving the cursor and scrolling with single keypresses. To enter Meta mode, click the
Berrykey once. The Meta mode indicatorwill appear in the top right corner of the screen.
You can view the Meta mode key map by holding the
Berrykey for 1 second:
Touchpad summary,
Press the touchpad itself to turn on touchpad mode, and start sending arrow keys when you move your finger across the touchpad. While active, you will see the touchpad indicator
in the top-right corner of the screen.
Clicking the touchpad itself again while the touchpad is active will send
Enter. Pressing theBackkey will exit touchpad mode.
You can also hold the
Shiftkey to temporarily turn on the touchpad until theShiftkey is released. You will see the Shift indicatorinstead of the touch indicator.
If you release the
Shiftkey without using the touchpad, you will instead get the sticky modifier behavior of applying Shift to the next alpha keypress. In this case, the Shift indicator will remain on the screen. Press and release theShiftkey again to un-stick the modifier and hide the indicator.
Idle service configuration
Next, you will be presented with an option to either enable or disable the beepy-idle service. Press Alt + Enter to switch between Yes and No options.
If enabled, this service will automatically shut down the Pi and deep sleep the RP2040 controller to preserve battery life.
The Pi will not shut down unless it has been 5 minutes since the last keypress, or if Tmux is running an active foreground process.
The timeout and allowed processes can be configured by editing the file at /etc/beepy-idle.conf. By default, if Tmux is running any process other than bash or gomuks, idle will be inhibited.
More information: beepy-idle service
Wireless network configuration
Two informational message boxes will be displayed with quick summaries on how to enter symbols and input arrow keys. For a more complete explanation than can be fit in a small message box, see the Beepy keyboard user guide.
nmtui will open to configure a wireless network. nmtui is a text-based configuration program for the NetworkManager service. Use the up and down arrow keys (accessible using Meta mode or with the touhcpad) to move between networks, and Enter to select a network to connect to. After a connection is established, press the Back key (mapped to Escape) to exit nmtui.
Applications and services
At this point, initial setup is completed.
Driver guides and configuration:
- beepy-kbd: Keyboard driver and firmware interface
- sharp-drm: Display driver and console font configuration
- beepy-fw: Device firmware, updating and configuration
Preinstalled Beepy software:
- beepy-gomuks: Gomuks Beeper client customized for Beepy
- beepy-tmux-menus: Tmux plugin for visually managing Tmux
- beepy-poll: OS service to wake up and run polling scripts
Documentation for these packages is also available in manpage format on-device. Run man package e.g. man beepy-kbd for keyboard documentation.

